Thursday, September 30, 2010
Tuesday, September 28, 2010
Ashlynn and Andrew

Here are some of the professional shots of Ashlynn and Andrew's wedding taken by Rose Feuerstein. She was kind enough to share some with me. She's got a great eye for detail, unique lighting, and capturing the feel of the wedding. Head on over here for more pictures of Rose's work. She's got a Fall Special going on now so take advantage of it!
Labels:
green,
Real Weddings
Thursday, September 23, 2010
Go Enter to Win This!
Head on over to Twig and Thistle and enter to win this silhouette paper cutter - amazing!! I've been eyeing these things for awhile now...
Labels:
Giveaways
Monday, September 20, 2010
Round Paper Garland Re-Purposed
Here's a section of the paper garland we made for the baby shower getting a second use on a present!
Labels:
DIY
Thursday, September 16, 2010
Christine's Baby Shower
Rachel and I threw an elephant/carnival themed baby shower for our friend Christine. I designed the elephant and we used it to create the posters, put it on the popcorn bags, food labels, and on the picks.
From our paper garland scraps Laura made the mini bunting.
Caramel Cupcakes (recipe here - This is a time consuming and detailed recipe but it's good if you have the time. I followed her alterations on the frosting, adding less butter and caramel, but it was still way to soft. I had to refrigerate it and even so it ran. Next time I'd increase the amount of egg whites or decrease the amount of butter.) The Caramel Apple Cupcakes were really easy and also delicious. No alterations required! (recipe here)
Labels:
Baby Shower
DIY: Easy Round Paper Garland
I made this for my friend, Christine's, baby shower. This round paper garland is really quick and easy. If you have large hole punches in various sizes it's even easier - but those get expensive. We used three sizes - my 1.5in punch and then hand cut the two larger sizes.
What you need:
assorted paper - great if you have scraps. I used heavy weight and cardstock.
sewing machine
scissors or round punches
parchment paper (optional)
Leave a long length of thread when you start so you have space to hang it. I placed a small piece of parchment paper underneath the first few circles to get the thread going without getting caught. (But I'm using a very old machine so yours might be fine without!) The parchment paper rips right off.
Leave a long length of thread when you start so you have space to hang it. I placed a small piece of parchment paper underneath the first few circles to get the thread going without getting caught. (But I'm using a very old machine so yours might be fine without!) The parchment paper rips right off.
Continue feeding circles under the needle. You can leave a little space between them if you prefer. When you're done leave extra on the end for hanging. And that's it! Easy!
If you make a smaller version you can use them to wrap presents.
If you make a smaller version you can use them to wrap presents.
Monday, September 13, 2010
Sneak Peek: Baby Girl Shower
I'm helping throw a baby shower for my friend, Christine, who's expecting a little girl. She has some really cute elephants in her nursery so I played off that theme and designed this elephant for shower decor. More to come when we finish!
Labels:
Baby Shower
Saturday, September 11, 2010
Saturday, September 4, 2010
DIY: Ribbon Wall
We wanted to create an inexpensive and outdoor-friendly backdrop for the head table so that photos wouldn't show the people throwing frisbees in the background.
Supplies:
poles - whatever length you need
(We already had a few 8' poles that we'd used for a previous project. If you don't they're available for around $1/ft (I think) at any hardware store.)
Poly Satin Ribbon in your colors (It's a lot cheaper than real ribbon and still looks great. Make sure to get at least 3 or more colors -you'll get a better affect. We used 2.5in. Available from a florist or some colors at Michaels.)
White Duct Tape
Fishing Line or thin wire
Tape the ribbon to the pole. Place each ribbon side by side - a slight overlap is ok. Cut ribbon a little longer than your distance from ground to ceiling. Attache wire to the ends of the pole for hanging. (We used both sides of the ribbon to get a slightly different color that was still close to her choice colors - red/white. We also used 2.5in ribbon).
Roll up the pole for transport. Attach pole. Unroll but leave slightly rolled to cover tape. String wire across the front of the ribbon to prevent it from blowing onto the people sitting down.
Total Cost: approx $20 per 8ft pole (cost varies depending on cost of ribbon. cost of pole not included)
Labels:
DIY
Friday, September 3, 2010
An hour before...
The room where we were hanging out had fantastic lighting! We took advantage of it and I grabbed a few pictures of my sister. These are some of my favorites.
Labels:
Real Weddings
Thursday, September 2, 2010
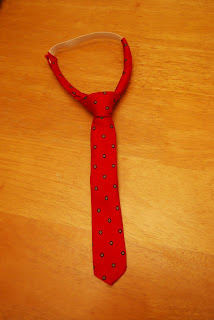
DIY: How to make a toddler tie from a man's tie
I am not a great sewer but this project was very simple. I did this in about 20min two days before the wedding. Pretty quick and easy but the back ended up a little sloppy. Total Cost: $5.00
This creates a skinny tie from a regular tie. (I went to a consignment store to find one cheap.)
Begin by tying a half windsor knot (or whatever knot you like) on the wrong end of the tie. And if, like me, you don't know how this is very helpful!
Slide the knot to the appropriate length for your toddler. (The knot will be thick so you might have to adjust it slightly). Sew the knot firmly into place. Your toddler will probably pull on the tie!
Cut off the remaining end.
Fold it in half. (If I'd had more time I would have liked to make a neat triangular point but I didn't... and it doesn't show). Sew the fold.
Cut the neck portion in half and trim down. Measure the neckline of the shirt. You will want the majority of the neck to be elastic so it can fit over his head but you also want it to be small enough so it won't hang down funny. I didn't keep track of my measurements here - I just tried it on and then trimmed etc...
Fold the neck pieces in half and insert the elastic into the fold. Sew firmly shut.
Make sure the tie fits around the neck and especially around your little guy's head!
Here's Asa's outfit for the wedding all set to go.

And here's my handsome little man sporting the tie! (All the guys wore skinny ties so he fit right in.)
Labels:
DIY
Wednesday, September 1, 2010
Lingerie Shower
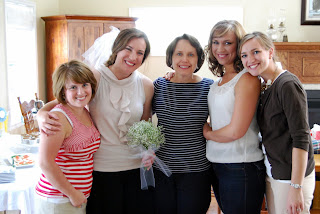
Since my sister couldn't make it in until right before the wedding we held the lingerie shower the morning before the wedding. Yes our schedule was ridiculously packed for the wedding weekend but we managed!
We combined it with the bridesmaids' party and my sister, sister-in-law and I threw a light brunch at my mom's house.
I found the metal jewelry holders (a dress and shoe) at Ross! We hung the pearl necklaces (the gift from the bride to the bridesmaids) on them. We used my great grandmother's and grandmother's tablecloth and lace runner.
We didn't have tons of time to decorate but my sister-in-law and I made these "ooh la la" signs with cardstock folded accordion style and punched with a Martha Stewart puncher. Mimosas are hiding in the back there.
Cheddar Scallion Savory Cupcakes and Smoked Salmon with Dill Cream Cheese.
Labels:
Bridal Shower,
DIY
Subscribe to:
Comments (Atom)


